Board index Roller Coaster Games Hard Hat Area NL2 Riverview Bobs

NL2 Riverview Bobs

The Hard Hat Area is the place to post construction news about your ride, so this is the place to hype your future upload!

Post March 27th, 2016, 8:41 pm

Posts: 8144
Points on hand: 13,491.00 Points
Coasterkidmwm wrote:
Inspiration can come back.

+1! I'm also impressed by this comment. I'll add this to my signature! :)
-- I was happy to be with NL1 - [:')] --

Post March 28th, 2016, 3:44 am

Posts: 110
Points on hand: 2,067.00 Points
No progress today - ended up spending most of the afternoon doing other things. Still, a good way to relax after a hectic weekend. Will try again tomorrow.

Happy Easter! :D

Post March 28th, 2016, 7:46 pm

Posts: 8144
Points on hand: 13,491.00 Points
^ Lobster, same to you! :D
-- I was happy to be with NL1 - [:')] --

Post July 26th, 2016, 7:39 pm

Posts: 110
Points on hand: 2,067.00 Points
It's been almost four months to the day since I last posted here. Tonight I'm going to start remaking the track from scratch and see where it gets me.

On reviewing this thread and remembering where I left off, it's clear that I need to start afresh from the station. Trying to connect the wiggly rollout with the lift hill just wasn't working, but if the final brake run ends up a little shorter than originally designed then I think I can live with that. One of my major bugbears was the first 30 degrees of TA1. No matter what I did I couldn't get it to ride smoothly because of the weird way in which NL2 places the nodes. That's probably one place I will have to draw the profile out on paper with the nodes in their actual places and then find the best way of creating a smooth curve. The straight and curved line generators are frustrating in their approximations. Still, I'm determined to get there somehow.

Having learned from a lot of mistakes the process will be as follows. First, I'll build all the track flat so I can see the entire footprint at once and bank the corners to make sure there are no positional errors. Banked track takes up more room than flat track. Care will be taken to make sure turn angles and sizes are correct as there are errors on the blueprint which need to be amended. Each straight section will be built in a separate park to make sure they don't drift from left to right. Then I will begin the long process of raising the height marks. Next I'll test the ride to make sure it works, adjust the friction values if necessary (does anyone know what the friction values are for Millennium Flyers in the sim?) and then raise the entire coaster off the ground ready for landscaping. I can't determine much of the landscape from photographs, but excavations are marked on the plan and these will need to look nice. :)

Hopefully I'll have something respectable by Christmas! :lol:

Post July 26th, 2016, 10:55 pm
Coasterkidmwm User avatar
True Addicts
True Addicts

Posts: 12284
Points on hand: 8,049.10 Points
Bank: 15,000.00 Points
Location: Illinois, USA
Do what you like and make sure you're building to make yourself happy, not other people. Also keep in mind that while yes it was smack in the middle of a major urban center, inaccuracies are going to happen and I wouldn't stress out too much over them.

Good luck! My mother lost a hat on the Bobs!
"Careful man, there's a beverage here!"

Post July 26th, 2016, 11:01 pm

Posts: 8144
Points on hand: 13,491.00 Points
^^ Many thanks for the retry! Yay this plan is still alive! :D
-- I was happy to be with NL1 - [:')] --

Post August 4th, 2016, 7:30 pm

Posts: 110
Points on hand: 2,067.00 Points
So I haven't done any building this week. Instead I've spent some time staring at my existing recreation, working out how to solve potential trouble spots in advance, and attempting to find a solution to recreating the dip after TA4. That dip may have to wait until the rest of the ride is complete. One particularly nasty spot is the rise out of the first drop into TA1, as the pearly-white node marking the transition could be deleted but not its roll point, thus making it impossible for me to create a smooth banking transition into the curve. Hopefully rebuilding it in a separate park and then importing it will solve that particular problem. My feeling is that the process of building the coaster will be a mixture of bolting parts on and recreating stuff "onsite".

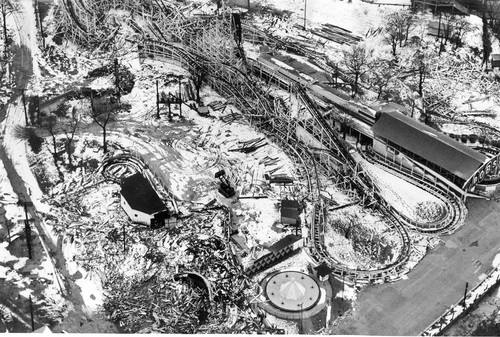
I found a new photo of the ride during demolition, hosted on the Man On Five website here:

Image

It helps confirm a few things about the position and angle of the rollout, and just how long that train workshop was! I will try and get some work done in time for an update with screenshots tomorrow night. I'm getting impatient with no vertical work. :)

Post August 10th, 2016, 7:25 pm

Posts: 110
Points on hand: 2,067.00 Points
I had a bit of time last night to play around with the existing fan curve entrance and I managed to sort of fix the wiggle, as for some reason the problematic pearly node and its roll point can now be removed. However, the heights of the first two bents are still wrong. Recently I've been learning how to create simple graphs in excel and it occurred to me that since the whole coaster is stored in an excel spreadsheet, it would be easy for me to make a simple profile graph with the bent numbers along the bottom and the relative heights on the y-axis. That way I could look at the line for the entire coaster and see where the trouble spots are before I build anything at all. I know for a fact that there are issues with the entry of TA3, so rather than waste any more time discovering further problems during construction or building the entire coaster in a straight line to check everything without the curves interfering, I'm going to halt building for now and focus on getting the maths right. Once that's done, I can be confident that I won't be going back and forth over my recreation, trying to work out where all the mistakes are. Onward and upward! 8-)

Post August 11th, 2016, 6:58 am

Posts: 110
Points on hand: 2,067.00 Points
Tonight I had a play with Excel. After a bit of experimenting I decided that instead of trying to convert the whole coaster into one long graph, I should just select the bit I wanted to check and then turn that into a graph. Now, on the graph all the bents are spaced evenly because of the way they are listed in the table. This means that the shape of the hill in the graph is not exactly as the hill would be if drawn out properly; however, it is good enough to show whether there are any kinks which shouldn't be there. Here is the profile for the fifth turnaround:

Image

Can you say, "Nice airtime"? :lol:

When I went back to the table to find out what had gone wrong, I discovered that a typo on my part had rendered the peak at an even 13 feet instead of the 12 feet it should have been. Correcting this made for a much nicer, smoother curve. There are more minor kinks dotted around the circuit, and you can see two of them in this turnaround: bent number 9 on the graph is too tall, as is bent number 4 on the graph.

Post August 11th, 2016, 7:06 am
mkingy User avatar
Moderator
Moderator

Posts: 5463
Points on hand: 28,058.00 Points
Bank: 0.00 Points
Location: United Kingdom
This is turning into a pretty cool journey for your recreation! I'm glad you're still working on it and progressing your ideas forward.
Coaster Count - 198
France 2019 Mini Trip Report

Post August 11th, 2016, 10:48 am
Coasterkidmwm User avatar
True Addicts
True Addicts

Posts: 12284
Points on hand: 8,049.10 Points
Bank: 15,000.00 Points
Location: Illinois, USA
Wow I've never seen someone graph out a ride lol! Great work so far.
"Careful man, there's a beverage here!"

Post August 11th, 2016, 6:37 pm

Posts: 110
Points on hand: 2,067.00 Points
Coasterkidmwm wrote:
Wow I've never seen someone graph out a ride lol! Great work so far.


Yeah, I wouldn't normally, but since Church has been so precise in his specification it's a practical thing to do. In addition it enables me to see kinks in the curves which aren't so visible once they're built. As part of my experimentation last night I noticed that small tweaks in bent heights of as little as one foot could have quite a big impact on the g-forces experienced. Given that the profile as it stands looks basically okay, I think the next thing is to build out what I have so far, take it for a spin and then adjust if necessary in combination with the g-force comb so I don't do anything silly. This is how I fixed two dodgy bents in the TA1 fan turn. I'm doing my best to stick with Church's height marks but if there's an obviously wrong one which causes a red spike, then I think it's fair to fix it.

Post August 12th, 2016, 7:39 am

Posts: 8144
Points on hand: 13,491.00 Points
^ Looking forward to seeing those mathematical dots on a graph, perfectly converted into your track plan! This year we'll see your awesomeness! My wish and of course ours!

:)
Last edited by lol240 on August 12th, 2016, 8:06 am, edited 1 time in total.
-- I was happy to be with NL1 - [:')] --

Post August 12th, 2016, 8:04 am

Posts: 110
Points on hand: 2,067.00 Points
Would anybody be interested in some stats? :lol: I decided to have a play with my existing track and fill in the run between the crossover and the midcourse to see how it rode (the first drop, TA1 and crossover and the fan curve of TA3 were already completed). I sat in the front seat. Maximum speed is 40 mph after the first drop and 41.5 mph dropping 4'10" below ground out of the crossover. Next comes a double up, with a nice pop of air at -1.5g, followed less than a second later by a crushing +3.6g as the train starts to rise into the midcourse, followed by a -1.5g pop of air onto the midcourse itself. Hot damn! :o I left the next stretch flat. The train's slowest speed around the TA3 horseshoe was 20mph, so allowing for friction over the previous hills if I'd bothered to build them, let's say 18 mph. For reference the TA1 horseshoe is completed at 16mph and the crossover's slowest point is about 23 mph. For a 64'9" lift, that's insane. And, if I may say so, it's a beautiful coaster to watch. :)

All of this has only given me more impetus to finish building Fred Church's masterpiece. :D

Post August 12th, 2016, 8:15 am

Posts: 8144
Points on hand: 13,491.00 Points
Oh your record of "+3.6" has just had me think of a story where the Dorney's notorious Hercules pulled an incredible g-force of 4 while doing a "jolty" triple up after the first swooping turn! Wow yours looks darn intense!

Keep it up! :D
-- I was happy to be with NL1 - [:')] --

Post August 13th, 2016, 2:22 am
mkingy User avatar
Moderator
Moderator

Posts: 5463
Points on hand: 28,058.00 Points
Bank: 0.00 Points
Location: United Kingdom

Post August 14th, 2016, 7:29 am

Posts: 110
Points on hand: 2,067.00 Points
After four hours of work, all I have managed is the station and the track from the beginning of the ride to the start of TA1. I haven't raised any of the height marks yet because I want to get the positional relationships right first. Unfortunately I had a lot of problems with the roll out curve under the brake run. It is drawn the same size as the other two roll out turns, but the only way I found to get NoLimits to render it properly was to increase the radius by two feet. It is definitely something I'll be coming back to at the end of the recreation. I'm now crossing my fingers that I won't have to play with the TA1 fan turn again, but that's an adventure for tomorrow. At least I know what I'm doing, though.

Post August 14th, 2016, 9:19 am
Coasterkidmwm User avatar
True Addicts
True Addicts

Posts: 12284
Points on hand: 8,049.10 Points
Bank: 15,000.00 Points
Location: Illinois, USA
Any progress is progress.
"Careful man, there's a beverage here!"

Post August 15th, 2016, 6:33 pm

Posts: 110
Points on hand: 2,067.00 Points
I'm back at ye olde turnaround problem. Will post another update tonight.

Post August 16th, 2016, 8:10 am

Posts: 110
Points on hand: 2,067.00 Points
I forgot that it's the little things which can make all the difference. The crossover curve marking on the blueprint starts between bents. This appears to be a curious thing - why not simply mark the start of the curve on the bent, and then it would be easier to see? Because the curve actually did start between bents, and so the length of the straight section between the exit of TA1 and the start of the crossover curve is 42.6 feet and not 42 feet. Lesson learned (again) - the radius values are sometimes wrong, but the boundary markers for the curves are not.

Tonight's second breakthrough came while I was calculating the number of degrees of curvature of TA3, the internal fan turn. I had noticed that TA2 wasn't quite far enough forwards, even once I was sure I'd got the crossover correct, and I wondered if the curve onto the lift used the same total curvature as TA3. Experimentation proved this to be the case, and also proved that I'd incorrectly measured the turns in the rollout, which is why I had to "cheat" by using a larger curve under the brake run.

Tomorrow will bring a complete rebuild of the rollout and the section from TA1 to TA3. :)

Post August 16th, 2016, 9:06 am
Coasterkidmwm User avatar
True Addicts
True Addicts

Posts: 12284
Points on hand: 8,049.10 Points
Bank: 15,000.00 Points
Location: Illinois, USA
Glad you figured that out
"Careful man, there's a beverage here!"

Post August 16th, 2016, 9:05 pm

Posts: 110
Points on hand: 2,067.00 Points
Coasterkidmwm wrote:
Glad you figured that out

Me too. Another thing I've just remembered is that the straight sections in and out of the underpass turn on the roll out weren't straight. They drifted slightly sideways.

Post August 20th, 2016, 9:30 am

Posts: 110
Points on hand: 2,067.00 Points
Playing with the banking on TA1.

By building the curve flat and then testing the banking, I can accurately check how smooth the transitions are before elevation changes muck everything up. It's much harder to test ideas once the curve is at full height. In this case I knew there was a problem with the start because my previous attempt had some really weird jerking from left to right during the first 30 degrees or so of the curve. This time I was able to see that the height marks for this section as far as I could make out (it's a bit difficult to discern the initial ones on the blueprint) were illogically arranged. Here are the banking angles in degrees as written on the print: 36, 32, 28, 48, 42, 36. You can see that the progression up to the 48 degree mark is somewhat haphazard. This causes the train to jerk. I switched the banking angles to the following: 38, 42, 48, 42, 36. With the entry banking neatly mirroring the exit banking the transition is almost perfectly smooth, and this is reflected by the g-force comb. Here is the curve with the revised banking:

Image

This process will have to be repeated with every curve on the entire ride, but the time spent now should pay dividends later once everything is built up. I should probably say that my intention is not to change what Church wanted and give it GCI-style banking. I am simply correcting what appear to me to be obvious mistakes and inconsistencies. I will preserve as much of Church's marked banking as possible. :)

Post August 20th, 2016, 1:27 pm

Posts: 8144
Points on hand: 13,491.00 Points
I tend to end up making a layout with no elevations when I seriously don't feel like working on. ;)
-- I was happy to be with NL1 - [:')] --

Post August 23rd, 2016, 7:02 am

Posts: 110
Points on hand: 2,067.00 Points
I've spent most of the past four evenings trying to solve the crossover problem once and for all. A mistake I made last time was not writing down the final radius and arc values. Tonight I finally succeeded, after 2.5 hours of solid work. I had to adjust the arc of the curve onto the lift hill because I noticed this was off by one degree! So the final values are as follows:

Curve onto the lift: 197 degrees
TA1: 265 degrees
Crossover: 53 degrees with a 77 foot radius.

On the actual plan, TA1 is 260 degrees and the crossover is 50 degrees with a 72 foot radius. It is hard to know how much of the difference was caused by Church or his draftsman screwing up versus the curve generator being somewhat approximate.

For the photo below, I wanted to test the clearance between TA1 and the internal fan curve of TA3 once the track was banked. Last time I built up these two curves their catwalks intersected to a dangerous degree through TA3's exit, as shown in my first post on page 5. It turns out I was missing 2 feet of track on course 2 which runs into TA3. Given that in both cases I built course 2 very roughly it is possible that this discrepancy will sort itself out in due course. If not, well, there's a piece of 2 foot long track I can simply insert. Note that for the experiment I banked both tracks to 55 degrees to cause as much interference as possible. TA1 has a maximum banking of 56 degrees, so this was close enough. :)

Image

PreviousNext

Return to Hard Hat Area


  • Related topics
    Replies
    Views
    Last post